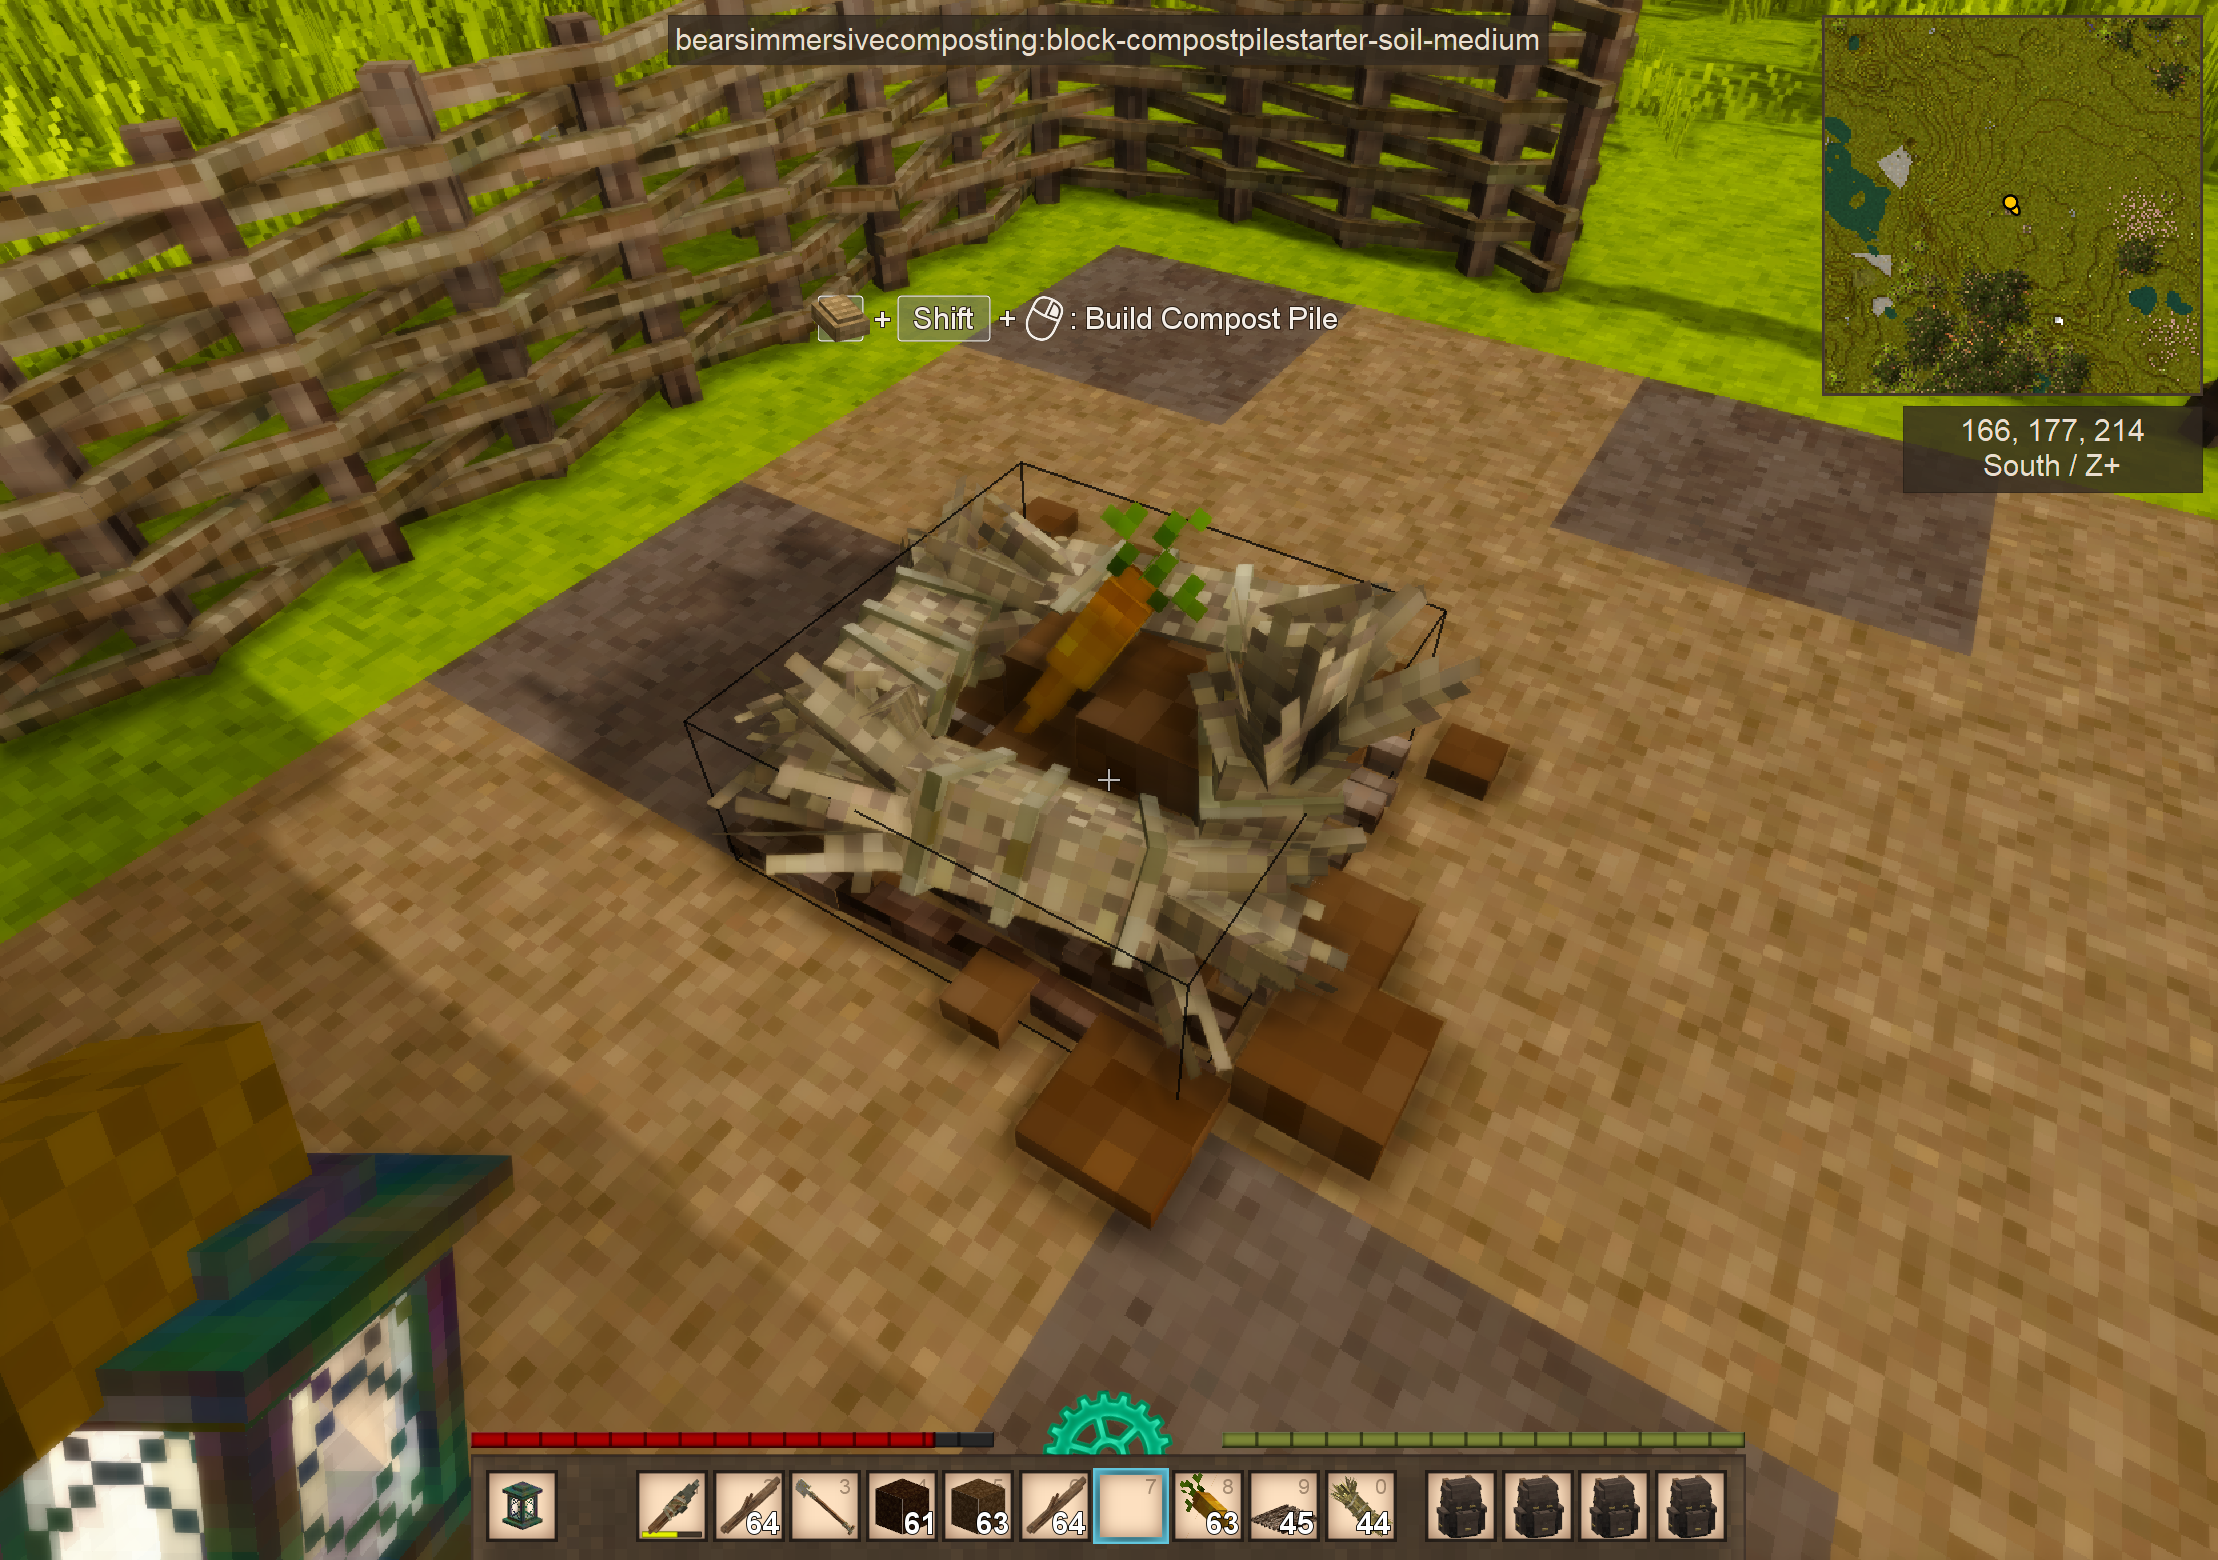
Been working on a more complex mod this time, figured if you found your way here you might as well have a preview.
Bear’s Immersive Composting will feature a growing, multiblock compost pile and a use for excess sticks, seeds, thatch, and more, all with a much better return on compost than vanilla.
Scenes are a fundamental building block of Unity projects. All of your game’s objects, from lights to cameras to terrain to characters, all must exist in the context of a scene loaded into memory. These packaged scenes are loaded or unloaded as needed, making scene management an essential task when developing anything more complex than a Pong or other arcade clone.
Unfortunately, the way scenes are managed is fundamentally different for the editor and the build. In the editor, scenes are scene assets, a kind of YAML file filled with prefab GUIDs and setting overrides. In the build, they are converted into a special binary format and no longer exist as separate assets. In the editor, scenes are files like any other asset. But to load a scene in a build, one must use the string name of the scene.
SceneManager.LoadScene("SceneName");
This makes referencing scenes at runtime a surprisingly clumsy task. As a string, the name is hardcoded (or stored as a serialized string defined in the inspector). Any changes to the scene asset reference, such as renaming the scene, must be manually retyped at every point it appears in the codebase. This introduces a lot of opportunities for bugs.
The SceneObject
The SceneObject scriptable object solves these problems by wrapping the scene asset reference in an object. In the editor, a scene asset reference can be set in the inspector and the SceneObject automatically stores the name as a string when the object is validated. This SceneObject can then be used and referenced like any other asset. At runtime, the saved string will be used instead, and the scene can be acquired by calling sceneObject.Scene.
publicclassSceneObject : ScriptableObject{ ///Implicitly converts a scene object into a Scene reference.publicstaticimplicitoperatorScene(SceneObjectself) {returnself.Scene; } // Implicitly converts a scene object to a string containing the scene name.publicstaticimplicitoperatorstring(SceneObjectself) { returnself.sceneName; }publicstringsceneName;publicScene Scene { get => SceneManager.GetSceneByName(sceneName); } #if UNITY_EDITORpublicUnityEditor.SceneAssetsceneAsset;publicvoidOnValidate() {sceneName=sceneAsset.name; } #endif}
This SceneObject has implicit casting to both a string and a scene, allowing it to be used in almost any scene-calling function as-is, converting to either a scene or a string depending on the function.
You can treat a SceneObject the same way you would expect to be able to treat actual scenes, without dealing with the hassle of strings. Just be sure to update the SceneObject asset associated with your scene whenever you rename it.
Conclusion
Scene references in Unity can be annoying to work with and prone to typos. By wrapping the scene reference in our own custom object, we can make working with them easier, and make changing or reorganizing them less of a headache later in the project.
Sequential and reversible actions are common in gaming. You may want the player to be able to issue a round’s worth of moves to multiple units and reverse the actions if they decide it’s a bad move, or make multiple selections in a menu and only undo the latest one. Undo functions are quite common in other applications, too, for obvious reasons; they provide users an easy way to return to a previous state, reversing a decision made in error or out of curiosity.
The Command Pattern offers a straightforward means of implementing this feature.
What Is the Command Pattern?
The Command pattern is a behavioral design pattern that encapsulates an action in an object. It allows for the action to be treated like any other object; it can be passed around and modified, added to lists or queues, referenced, or constructed and executed at different times. It aids in Separation of Concerns, removing the actual logic of the action from both the sender and receiver, allowing scripts to remain unaware of each other’s logic while still communicating effectively.
Implementation
This implementation is specifically designed for a turn-based strategy Unity game, but the same principles can be applied in other applications or games; it can be adapted to UI or puzzle games easily, or expanded to allow for time-reversal abilities in other games.
In this implementation, command objects are enqueued to a manager class, which executes them sequentially. This class may be an overarching game manager, a UI manager, or an individual game entity, depending on what actions it will receive. When an action is completed, it adds the command to a command history Stack. If called to undo an action, the manager takes the last run command from the history and executes its Undo() function.
If an irreversible action is taken, the history is cleared instead.
The Command Object
The most important part of this design is, of course, the command object. In this case, the command takes the form of an abstract GameAction class, from which the actual actions will be derived. This could be user-provoked types like MoveAction or AttackAction, or internal system behaviors such as LevelUpAction or OpenMenuAction.
publicabstractclassGameAction{ // If true, the game action can be reversed. If false, // the player cannot undo this action.publicvirtualbool IsReversible {get => false; }publicvirtualvoidStart() { }publicvirtualvoidUpdate() { }publicvirtualvoidComplete() { }publicvirtualvoidUndo() { }publicvirtualboolIsFinished() {returntrue; }}
This GameAction class provides the function signatures that will be implemented by the individual actions, allowing the manager to treat them interchangeably. An example implementation of an action to move a unit looks like this…
publicclassMoveAction : GameAction{privatereadonlyUnitunit;privateVector3startPoint;privateQuaternionstartRotation;privateVector3endPoint;privatePathpath;privateStack<Tile> waypoints;privateTiletargetTile;publicMoveAction(Unitunit, Pathpath) {this.unit=unit;this.path=path;this.startPoint=path.startTile.transform.position;this.endPoint=path.endTile.transform.position;waypoints= new Stack<Tile>(path.tiles); } // Sets the unit to the start point (for cleanliness) and moves them // to the first tile.publicoverridevoidStart() {unit.transform.position=startPoint;startRotation=unit.transform.rotation;targetTile=waypoints.Pop();unit.NavMeshAgent.destination=targetTile.WorldSpacePosition; } /// Updates movement, checking if the unit has approached the waypoint and grabbing the next /// in the sequence.publicoverridevoidUpdate() {if (Vector3.Distance(unit.NavMeshAgent.destination, unit.transform.position) <0.2) {unit.transform.position=unit.NavMeshAgent.destination;if (waypoints.Count>0) {targetTile=waypoints.Pop();unit.NavMeshAgent.destination=targetTile.WorldSpacePosition; } }unit.Animator.SetFloat("MoveSpeed", unit.NavMeshAgent.velocity.magnitude); } /// Returns the unit to the start location when undoing the action.publicoverridevoidUndo() {unit.transform.SetPositionAndRotation(startPoint, startRotation);unit.MoveUsedThisTurn-=path.totalCost; } /// Snaps the unit to the destination point on completion.publicoverridevoidComplete() {unit.Animator.SetFloat("MoveSpeed", 0f);unit.MoveUsedThisTurn+=path.totalCost;unit.transform.position=endPoint; } /// Checks if the unit has arrived at their destination.publicoverrideboolIsFinished() {returnVector3.Distance(unit.transform.position, endPoint) <0.2; } }
The command object stores all information about the action in itself and acts as a liaison between the sender and receiver. The connection can be further divided with movement functions handled by the unit itself, with the MoveAction merely handing off parameters and calling the appropriate functions on the unit.
Because this object stores the original state in its parameters, it can also be called to reverse the action later if necessary.
The Command Queue
The command objects are submitted to a queue contained by a higher-level manager class, such as your UI manager. This manager, in this example called the GameDirector, selects an action from the queue, starts it, then repeatedly updates it until the action indicates it is finished. The GameDirector then performs any cleanup tasks via Complete(), places the completed action into a history, and selects the next action and repeats the cycle.
publicclassGameDirector : MonoBehaviour{privateGameActioncurrentGameAction;privateQueue<GameAction> gameActionQueue= new();privateStack<GameAction> actionHistory= new();privatevoidUpdate() { // Checks for any game actions. If there is one in the queue, select it and start it.if (currentGameAction==null) {if (gameActionQueue.Count>0) {currentGameAction=gameActionQueue.Dequeue();currentGameAction.Start();return; } }else { // Update the current game action until it is completed.currentGameAction.Update();if (currentGameAction.IsFinished()) {currentGameAction.Complete();SaveToActionHistory(action);currentGameAction=null;return; } } // Processing of lower priority queues, if any, can be added here }}
This allows for the player to queue up actions for units without interrupting the current action and to ensure that actions are performed one-after-another.
Once an action is finished, it is added to a history (implemented here as a Stack<GameAction>) via the function SaveToActionHistory() . Stacks are ideal for this task because they are a Last-In, First-Out collection; the most recent action is on the top, so they are pulled in reverse chronological order.
Typically, if an action is not reversible, neither should earlier actions. If attempting to save an irreversible action, the GameDirector instead clears the action history, rendering the prior changes permanent and freeing up the memory they used.
// Adds an action to the action history if it is a reversible action, clears the history if not.privatevoidSaveToActionHistory(GameActionaction){if (action.IsReversible) {actionHistory.Push(action); }else {actionHistory.Clear();actionHistory.TrimExcess(); }}
Reversing Changes
In this implementation, reversing a change is easy. The GameDirector pulls the last action from the history and tells it to reverse the stored changes. The command object is then discarded.
// Pulls the last action from the action history and reverses it.publicvoidReverseLastAction(){if (actionHistory.Count>0) {actionHistory.Pop().Undo(); }}
If desired, a second Stack can be used to store undone actions the same way; this would allow for a Redo feature. In this case, you would have the GameDirector clear the redo stack whenever a brand new action is started.
Conclusion
The command pattern is great for any game in which actions need to be both reversible and sequential. Moves in puzzle games, unit actions in strategy games, and combat in RPGs can all be implemented easily in this way. Even for other games, this design pattern is useful for UI interactions and menus where a player may want to return to their original selection or navigate back up a menu tree the way they came.
It can even be used to record player input and play it back and forth.
This design is a solid framework on which to build your user input and game flow control systems, as it is easy to use and lends itself well to the addition of new actions.
In game development, you often find that you need to access a certain variable or object from many different places. Things like the score, the player’s health, a user-configured setting, and more are frequently needed by many different components throughout the game.
For simple situations, it’s perfectly fine to just access a public property directly using a reference set in the inspector or through Unity’s find object functions. But direct references sometimes don’t make sense or aren’t possible, or would be excessively cumbersome to use and maintain.
For these situations, you want a global variable.
What Is A Global Variable And Why Would I Want One
A global variable is a variable that is defined outside of any classes and is accessible to all functions. True global variables aren’t possible in Unity, but there are tricks you can use to get the next best thing.
Global variables save time and memory by creating a centralized place to find a necessary piece of data. Further, because the functions are all referencing the same variable, changes to the variable are automatically picked up the next time it is read.
The Non-Unity Way
In many applications, global variables are achieved by creating a static class with the variables as its members.
This is a tried and true method, and can work great for your use case. The variables are not tied to any instance and can be accessed anywhere using the class name instead of an instance reference. For example, the current health of the player is Globals.playerHP.
It might not be ideal for a game built in Unity, however.
One problem with this method is that the variables are hard-coded. Adding new ones or changing the default value of them requires recompilation, and they cannot be created at runtime or changed to reference a different variable.
Another problem is that they are not logically connected; the only thing the variables have in common is that they are all globally accessible. This can be corrected by creating subclasses within the Globals class and organizing the variables there, such as Globals.PlayerData.playerHP.
But most importantly, the biggest problem with this method is that these variables are not accessible to the Unity inspector, which makes working with them much more difficult.
Global Variable Scriptable Object
These problems can be solved with the power of Unity’s Scriptable Objects system. Scriptable objects are instances of a class that are instantiated as assets in the filesystem rather than objects in the scene, which makes them ideal for this application.
To simplify the amount of code we need to write and maintain, we will create a base Global Variable scriptable object containing a generic type.
usingSystem.Collections;usingSystem.Collections.Generic;usingUnityEngine;/// <summary>/// Stores a variable for global accessibility./// </summary>/// <typeparamname="T">The type of variable to be stored.</typeparam>publicclassGlobalVariable<T> : ScriptableObject{ [Tooltip("The current value of this variable at runtime.")] [SerializeField] protectedTruntimeValue;/// The current value of the global variable.publicvirtualT Value {get => runtimeValue;set => runtimeValue=value; }}
This object is very simple; it contains a Value property backed by a serialized field.
In C# you can instantiate generics with a specified type at runtime (as you do with List<int> and Dictionary<string, float>, for example), but Unity does not support generics directly and requires concrete types. While you may not be able to use GlobalVariable<T> scriptable objects, you can inherit from them with concrete types usable by Unity while still benefiting from having all code handled in one class.
Create derived classes inheriting from the GlobalVariable class specifying the type of variable you want it to contain. There is no need for a body, as all the code is inherited from the base GlobalVariable class. These can then be instantiated as global variable scriptable objects of that type.
// Global variable containing a boolean.publicclassGlobalBool : GlobalVariable<bool>{}// Global variable containing a float.publicclassGlobalFloat : GlobalVariable<float>{}// Global variable containing a GameObject reference.publicclassGlobalGameObject : GlobalVariable<GameObject>{}
GlobalBool could be instantiated as ShowSubtitles, DarkModeEnabled, AimAssist, KeepInventoryOnDeath, or DoFireTick, for example.
To utilize these global variables, all you need to do is define a reference to a GlobalBool or GlobalFloat in the code needing access to the global variable, drop a reference to the scriptable object into the field using the Unity inspector, and access the Value property of the global variable in code.
// Another script sets this global variable to the gameobject under the mouse[SerializeField] privateGlobalGameObjectaimTarget;// Displays the name of the game object under the reticle in a textboxaimTargetNameDisplay.Text=aimTarget.Value.Name;
Now you have a value that can be read or set by any interested party and shared by many objects, even across scenes! This is a great way to store user settings like UI scale, aim assist strength, and difficulty modes.
Defining a Default Value
There is one problem with the simple global variable class above… the value doesn’t reset once changed! If the player was hurt before exiting play mode, you find that they’re still hurt when you re-enter play mode, even though you started the level over!
Scriptable Objects, because they are persistent files, are never reset to their original state, even when restarting the game. In some cases, this is desirable, and in others, it’s not.
Give the variables an option to reset by storing their default value as a new field, and adding a function to set the runtimeValue to the defaultValue at a chosen stage in the scriptable object life-cycle. A simple boolean can enable or disable this behavior on a per-object basis, if desired.
[SerializeField] protectedTdefaultValue;[SerializeField] protectedTruntimeValue;[SerializeField] protectedbooldoReset=true;// . . .privatevoidOnValidate(){ // Resets the global variable when being updated in the editorResetValue();}privatevoidAwake(){ // Resets to default value when the game is loadedResetValue();}privatevoidResetValue(){if (doReset) runtimeValue=defaultValue;}
Adding ResetValue() to OnValidate() causes the variable to reset whenever changes are made to the object in the Unity inspector.
Adding it to Awake() makes it reset whenever it is initially loaded, which may be anywhere between when the game starts and when the variable is first accessed.
Choose the one that is right for you, or do a boolean for both for even more fine-tuned control.
And there you go! A default value can now be defined and the scriptable object will return to that value once the reset conditions are met.
Variable Change Events
While having multiple scripts accessing the same variable helps the scripts to share information, you may want to go a step further and actively alert interested scripts when the variable changes instead of having them check periodically.
Implementing a property changed event is easy!
Add a delegate to the base GlobalVariable class, and invoke it in the Value property setter. That’s all there is to it! Now, all of your global variables have a built in PropertyChanged event to which interested scripts can subscribe, which will be fired every time a change is made to the global variable’s value.
You can subscribe a function using the additive compound assignment operator, as you would for any delegate, or use subtractive to unsubscribe.
// registers the UpdateHealthbarFill function to listen for changes to// the player's health valueplayerHealthGlobal.OnValueChanged+=UpdateHealthbarFill;// . . .publicvoidUpdateHealthbarFill(floatnewHealth){ // change healthbar fill level here}
An obvious use for this is to have the health bar UI element automatically change in response to a change in the player’s hit points, or have the enemy name tag at the top of the screen change to the name of whatever game object is being aimed at with the reticle.
Conclusion
Effectively sharing information between scripts is essential for a successful game. Global variables powered by scriptable objects are a great way to centralize key data points to make sure everything is updated without excessive or cross-scene references.
At some point, you’ve likely encountered a situation where you needed to trigger functions or change variables in response to a change elsewhere in your code. For example, you may want to:
Play sad music and display a game-over screen when the player’s health reaches 0.
Change the animation set when the player’s health drops below 25%.
Trigger a special ability when the player is damaged.
While you can have these components check the player’s health every Update(), this quickly becomes unwieldly.
Running checks in Update() is wasteful; it still consumes processor time even if there is no change. When you have many scripts on many objects checking many different variables, this can significantly impact your performance. The real cost, however, lies in code maintenance. You need to maintain references to everything and the code to check each condition for each object throughout your codebase, making it challenging to modify or expand your code.
Instead of relying on thousands of if/else statements, consider building an Event System.
What is an Event System?
An event system is a system that allows scripts to broadcast information to other scripts that are listening. Think of it as a news radio; recent events are broadcast on the news channel, and anyone tuned in and listening will receive this information without repeatedly checking or asking for updates.
Event systems are essential for games with any degree of complexity. They enable different scripts to communicate with each other in a clean and maintainable way, without requiring an extensive web of references or allowing scripts to be directly controlled by other unrelated scripts.
While there are many ways to structure an event system depending on your needs, two methods I recommend are via an Event Manager or Event Channels.
Method 1 : Event Manager Monobehavior
A popular method is to create a singleton event manager, an object of an EventManager class designed so that only one instance exists at a time and is accessed through the class’s properties.
usingSystem;usingSystem.Collections.Generic;usingUnityEngine;/// <summary> Broadcasts events and associated data to interested parties. </summary>publicclassEventManager : MonoBehaviour{privateDictionary<GameEvent, Action<Dictionary<string, object>>> eventDictionary;privatestaticEventManagereventManager;publicstaticEventManager instance {get { // if no instance is set, search for one in the sceneif (!eventManager) {eventManager=FindFirstObjectByType(typeof(EventManager)) as EventManager;if (!eventManager) { // Still didn't find one, throw an error.Debug.LogError("There needs to be one active EventManager script on a GameObject in your scene."); }else { // initialize the event dictionary for the newly found instance And flag it // so it is not destroyed on scene loadingeventManager.Init();DontDestroyOnLoad(eventManager); } }returneventManager; } } /// <summary> Initializes the event dictionary. </summary>privatevoidInit() {if (eventDictionary==null) {eventDictionary= new Dictionary<GameEvent, Action<Dictionary<string, object>>>(); } } /// <summary> Registers a function to the event listener. </summary> /// <paramname="eventID"> The event we are listening for. </param> /// <paramname="listener"> The function that is subscribing. </param>publicstaticvoidStartListening(GameEventeventID, Action<Dictionary<string, object>> listener) {if (eventManager==null) return;Action<Dictionary<string, object>> thisEvent;if (instance.eventDictionary.TryGetValue(eventID, outthisEvent)) {thisEvent+=listener;instance.eventDictionary[eventID] =thisEvent; }else {thisEvent+=listener;instance.eventDictionary.Add(eventID, thisEvent); } } /// <summary> Unregisters a function from the event listener. </summary> /// <paramname="eventID"> The event we were looking for. </param> /// <paramname="listener"> The function that was listening. </param>publicstaticvoidStopListening(GameEventeventID, Action<Dictionary<string, object>> listener) {if (eventManager==null) return;if (instance.eventDictionary.TryGetValue(eventID, outAction<Dictionary<string, object>> thisEvent)) {thisEvent-=listener;instance.eventDictionary[eventID] =thisEvent; } } /// <summary> Triggers an event, activating all the functions registered to the event. </summary> /// <paramname="eventID"> The event to trigger. </param> /// <paramname="eventData"> The data carried by the event. </param>publicstaticvoidTriggerEvent(GameEventeventID, Dictionary<string, object> eventData) {if (instance.eventDictionary.TryGetValue(eventID, outAction<Dictionary<string, object>> thisEvent)) {thisEvent?.Invoke(eventData); } }}
This general-purpose EventManager class has three important functions, StartListening(), StopListening(), and TriggerEvent(). Because they are static, they can be accessed from anywhere, without having to find or store a reference to the manager (it does this itself).
The list of subscribers is stored in a dictionary of delegates in the form of Actions, with a GameEvent enum as the key. Using an enum as the key is beneficial due to the ability to use your IDE’s IntelliSense to find or autocomplete it, preventing bugs caused by typos.
To subscribe a function to an event, you pass the function and the event you want it to listen for to the manager through StartListening().
// Start listening for game pause eventsEventManager.StartListening(GameEvent.GamePaused, OnGamePaused);
This registers the function to the delegate associated with that game event.
To trigger an event, you call TriggerEvent(), creating a new event data dictionary containing the data you need to broadcast in the form of a Dictionary<string, object>.
The event data dictionaries have string keys and accept any object, allowing you to broadcast any type of data or multiple types through the same function using human-readable labels.
To use the data from the dictionary in the subscriber function, retrieve it from the dictionary by key and cast it to the appropriate type. The data must be cast because it is stored as a generic object.
Finally, once you’re done listening for events, unsubscribe from the event manager using the StopListening() method. This is necessary because the delegate does not check for duplicate functions, nor does it automatically remove references to inactive or destroyed objects. This creates the potential for memory leaks and bugs such as functions being called multiple times per event trigger.
There is no harm in unsubscribing an unsubscribed function, so a good practice is to unsubscribe from every event you listen for during OnDisable() or OnDestroy().
privatevoidOnDisable() { // Stop listening for game eventsEventManager.StopListening(GameEvent.GamePaused, OnGamePaused);EventManager.StopListening(GameEvent.GameUnpaused, OnGameUnpaused);EventManager.StopListening(GameEvent.PlayerDead, OnPlayerDead);}
That’s it! Now you have an event manager!
Just add the EventManager component to a game object in the main scene.
Summary
Pros:
Accessible. Universally accessible without references or searching for instances.
Flexible. Can transmit any number and any type of parameters to the subscribers.
Simple. All events are handled the same way through the same three functions regardless of what they broadcast.
Cons:
Inefficient. Requires the creation of a new Dictionary<string, object> each trigger, regardless of if any data is actually being transmitted. Using transmitted data requires casting, an additional performance cost.
Error-Prone. String keys are prone to typos that will not be picked up by the IDE; “ItemUsed”, “Item Used”, and “Item used” are three completely different keys.
Increased Debugging Difficulty. It is not possible for an IDE to determine which functions are listening to what events, making it more difficult to track down bugs.
Non-Serializable: The delegates cannot be serialized, meaning the listeners cannot be saved to a file and must be re-registered in code if the game is reloaded.
Notes:
You could remove the event data dictionaries to avoid the memory allocation and performance issues if you do not need to broadcast data.
You may choose to use an EventData enum for a key, or replace the dictionary with an EventData struct to avoid issues with string keys or casting.
Method 2 : Event Channel Scriptable Objects
An alternative to the monolithic event manager class is to separate your events into individual objects called event channels. This is achieved using Scriptable Objects. An event channel that passes no arguments looks like the following.
/// <summary>/// An event channel that does not broadcast a variable./// </summary>[CreateAssetMenu(fileName ="New Void Event Channel", menuName ="Scriptable Objects/Events/Void Event Channel")]publicclassEventChannel : ScriptableObject{ // -----------------------------------------publicUnityActionEvent;publicboolautoClean=true; // ----------------------------------------- /// Clears the event list when out of scopeprivatevoidOnDisable() {if (autoClean) {Event=null; } } /// Triggers the event in this channel.publicvoidBroadcast() {Event?.Invoke(); }}
From this base class, you create new instances of the scriptable object representing the events you need, such as GamePaused, GameUnpaused, MenuOpened, or StartSceneTransition.
To subscribe to the event, the subscriber must first obtain a reference to the event channel object in question. This is easily done by dropping a reference to the channel in the listener script using the Unity inspector.
In code, subscribe to the event’s delegate using the additive compound assignment operation, as you would for any other delegate.
// This is set via inspector to the PlayerDamaged event channel object.[SerializeField] privateEventChannelplayerDamaged;privatevoidStart() { // Start listening to the eventplayerDamaged.Event+=OnPlayerDamaged;}privatevoidOnDisable() { // stop listening to the eventplayerDamaged.Event-=OnPlayerDamaged;}// This function is run when the event is triggeredpublicvoidOnPlayerDamaged() {Debug.Log("Player took damage.");}
Once referenced, trigger the event either directly or using the event’s Broadcast() function.
// Trigger directlyplayerDamaged.Event?.Invoke();// The helper function just looks cleanerplayerDamaged.Broadcast();
As with the Event Manager monobehavior, it is important to remove all event subscriptions from the event channel when no longer needed. Scriptable objects persist through sessions and will collect references to destroyed or inaccessible objects as gameplay continues if not properly handled. The event channel’s OnDisable() function clears the delegate when the channel itself is unloaded to prevent this persistence, but other objects can still create garbage and null reference exceptions if they do not unregister themselves properly.
However, you can disable the auto-clearing if you want persistent event references (such as setting up level-specific events or UI events). In this case, properly unsubscribing listeners is crucial.
Event Channels With Data
You can create additional event channels that accept one or more parameters for more complex events. An easy way to implement this is with generic classes.
/// <summary>/// An event channel that broadcasts a single variable./// </summary>[CreateAssetMenu(fileName ="New Single Event Channel", menuName ="Scriptable Objects/Events/Single Event Channel")]publicclassSingleEventChannel<T> : ScriptableObject{ // -----------------------------------------publicUnityAction<T> Event;publicboolautoClean=true; // ----------------------------------------- /// Clears the event list when out of scopeprivatevoidOnDisable() {if (autoClean) {Event=null; } } /// Triggers the event in this channel.publicvoidBroadcast(TfirstParameter) {Event?.Invoke(firstParameter); }}
While you can’t use a generic class directly in Unity, you can inherit from it to create concrete variations that all share the same code. You can create new data channels by writing empty channel classes that derive from the generic one but with a specified type.
/// <summary>/// An event channel that broadcasts a single integer./// </summary>[CreateAssetMenu(fileName ="New Int Event Channel", menuName ="Scriptable Objects/Events/Int Event Channel")]publicclassIntEventChannel : SingleEventChannel<int>{}/// <summary>/// An event channel that broadcasts a single player reference./// </summary>[CreateAssetMenu(fileName ="Player Event Channel", menuName ="Scriptable Objects/Events/Player Event Channel")]publicclassPlayerEventChannel : SingleEventChannel<Player>{}
These concrete implementations can be instantiated as ScoreChanged, DamageTaken, and TokensRecieved, or PlayerDied, PlayerSpawned, and PlayerPickedUpToken, for example.
You can expand this further to create even more complex channels.
/// <summary>/// An event channel that broadcasts four variables./// </summary>[CreateAssetMenu(fileName ="New Quad Event Channel", menuName ="Scriptable Objects/Events/Quad Event Channel")]publicclassQuadEventChannel<T, I, J, K> : ScriptableObject{ // -----------------------------------------publicUnityAction<T, I, J, K> Event;publicboolautoClean=true; // ----------------------------------------- /// Clears the event list when out of scopeprivatevoidOnDisable() {if (autoClean) {Event=null; } } /// Triggers the event in this channel.publicvoidBroadcast(Tfirst, Isecond, Jthird, Kfourth) {Event?.Invoke(first, second, third, fourth); }}[CreateAssetMenu(fileName ="New PTIV Event Channel", menuName ="Scriptable Objects/Events/PTIV Event Channel")]publicclassPTInvV3EventChannel : QuadEventChannel<Player, Token, Inventory, Vector3> {}
This could be used to implement events like PlayerDepositsTokenIntoInventoryFromDirection, which might be overly specific but serves as a good demonstration.
And there you have it. Event channels!
Summary
Pros:
Compartmentalized: Each channel exists as its own globally accessible file with no need for a manager game object.
Performant. Uses only delegates and function parameters, with no casting or object creation required.
Serializable: References and listener lists can be saved to a file, allowing them to persist across scene loads and be set via the inspector.
Easier Development. Strong typing allows for autocompletion and code-traversal by the IDE.
Cons:
Game Asset: Each game event is its own asset in the filesystem, which can be difficult to reference without the Unity inspector and can be slow to find in folders when there is a large number of events used.
Requires References: Scripts need to reference a specific channel instance, which must be updated or restored if lost by error or code modification.
Persistent: Failing to unsubscribe properly results in additional headaches due to the persistence of the scriptable objects, especially during development.
More Setup Time: Unlike the Event Manager, you need to create and manage event channels individually, as well as write a new event channel class for every combination of parameters you want to broadcast.
Notes:
Complex events may benefit from using an EventArgs struct to wrap the data, so adding data to the broadcast only requires you to add a property to the struct instead of a new parameter to the event channel and every listener it calls.
You may wish to add a name and description string field to the event channel so you can make notes of what the event is intended to do or how it is intended to be used.
Conclusion
Your event systems are a crucial part of your game’s architecture; they allow for clean and maintainable communication between hundreds or even thousands of different components. But there are many ways to do it, and building the right tool for your use case makes your life as a developer easier and increases the chance you will successfully publish your game!